Unaunahi Tā
Unaunahi Tā
Unanahi Tā reflects individual guardianship and protection over taonga and stories connecting us to Te Taiao.
Back to Whatu Marama
Kaupapa 01
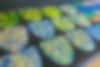
Unaunahi Tā - Printed Scale
Unanahi tā is about the taniwha’s scale that emanates individual guardianship and protection over taonga and stories connecting us to Te Taiao, the natural enviroment.
Unaunahi tā encourages class or school collaborations by each creating a Kiri Taniwha to create a large Taniwha installation. This Taniwha installation can be made of multiple unaunahi prints bringing light and celebration to the multiple layers of culture, heritage, tangata whenua and Te Taiao.
Unaunahi tā encourages class or school collaborations by each creating a Kiri Taniwha to create a large Taniwha installation. This Taniwha installation can be made of multiple unaunahi prints bringing light and celebration to the multiple layers of culture, heritage, tangata whenua and Te Taiao.
Papamahi Activity
Design and create your own unaunahi tā (printed scale) that reflects your identity and connection to the wai (water) and whenua (land) – Ko Wai Ahau and the spaces of protection within Te Taiao.
Task 01: Brainstorm
Group students into groups of 4 students for brainstorm activities. Create a discussion around Kaitiaki Taniwha exploring questions such as:
What is a Taniwha?
Do you know of one?
Why do they exist?
What are its 3 super powers, characteristics, form, skin and name?
What is a Taniwha?
Do you know of one?
Why do they exist?
What are its 3 super powers, characteristics, form, skin and name?

Task 02: Gestural Drawing
Tuhituhi (draw) to make small quick sketches on white paper using Indian ink and BBQ skewers. Using fast and loose lines to suggest a pattern, form, shape or an idea. Draw ideas starting with:
Awa, maunga, mist – kohu, textures of leaves, tree bark, water currents, the sound of crashing waves, falling rocks, tides, wind,
Awa, maunga, mist – kohu, textures of leaves, tree bark, water currents, the sound of crashing waves, falling rocks, tides, wind,

Task 03: Unaunahi Print
Using the work from Task 01: Brainstorm and Task 02: Gestural Drawing, create a print that best reflects your ideas and whakaaro.
a) Firstly draw the shape of your Unaunahi scale onto a piece of white cardboard or core flute and cut out carefully. Use the unaunahi scale size template provided by ĀKAU to give you the size you need and to indicate where you need holes.
b) Colour the surface of your Unaunahi scale with light colours inspired by the natural environment surrounding you.
c) Take an A4 size foam card and draw using a pencil your shapes and patterns drawn from your gestural drawing page. Cut out carefully using a paper cutting knife or scissors.
Note: If students cannot use paper cutting knives they can create a relief print by gluing cut out foam card shapes onto their A4 size foam card instead. Allow to dry completely before printing process.
d) Take your foam card stencil and paint the surface with an even thin layer of paint and then transfer the painted foam card stencil onto a test A3 size piece of paper and press evenly to help transfer the image. Separate foam card and test paper and check to see if your foam card print needs any changes or less paint to achieve a clear image.
e) Repeat the printing process again and print onto your Unaunahi scale you made earlier.

Task 04: Miharo!
When all of the Uanaunahi scales are completed and dry arrange them into a pattern and join together using twisters or string. Take a fun photo with your finished Unaunahi and upload it here!